
The sensors on a line record when it runs and when it stops, whether or not anyone is logged in. A Session is what connects that record to the people working the line.
An operator starts a Session at the beginning of their work on a line, adds reasons to stops as they appear, and ends the Session when they finish. The Session also records how many people are on the line and what the line is producing.
Words to Know
| Term | What it means |
|---|---|
| Session | A line operator starts a Session on a line in order to begin logging downtime reasons. |
| Shift | A scheduled block of working hours, such as 9 AM to 5 PM. |
| People count | How many people are working the line, including yourself. |
| Material | The product the line is currently producing. |
| Stop | A period the sensors recorded as the line not running. |
| Reason | The explanation for a stop, chosen from a set list. |
| Annotate | To add a reason to a stop. |
| Needs Annotation | The list of stops that are still waiting for a reason. |
| Microstop | A very short stop — one too short to need a reason (typically less than 2–5 minutes). |
Before You Start
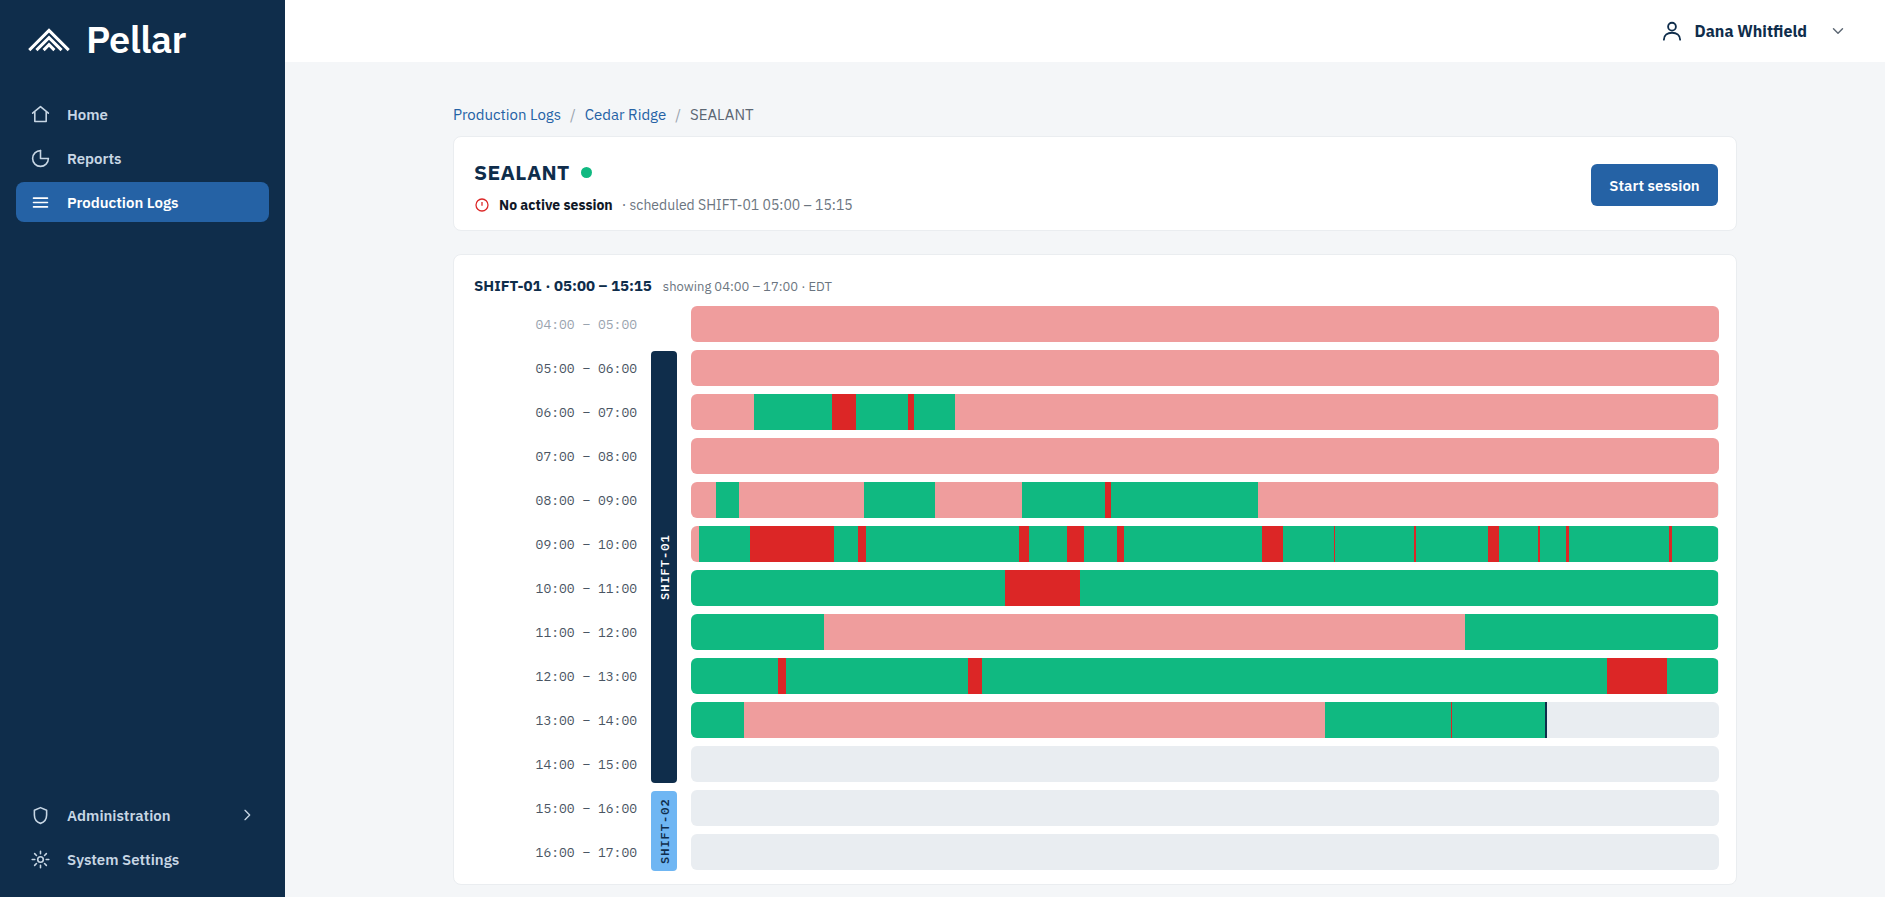
Open Production Logs in the left pane of Artemis Cloud, select your factory, then your line.
The header at the top of the screen shows the current state of the line (up, unplanned down, planned down, etc.). Before anyone begins, it reads No active session. It will also show what shift is currently operating, for example, first shift or second shift.
Starting Your Session
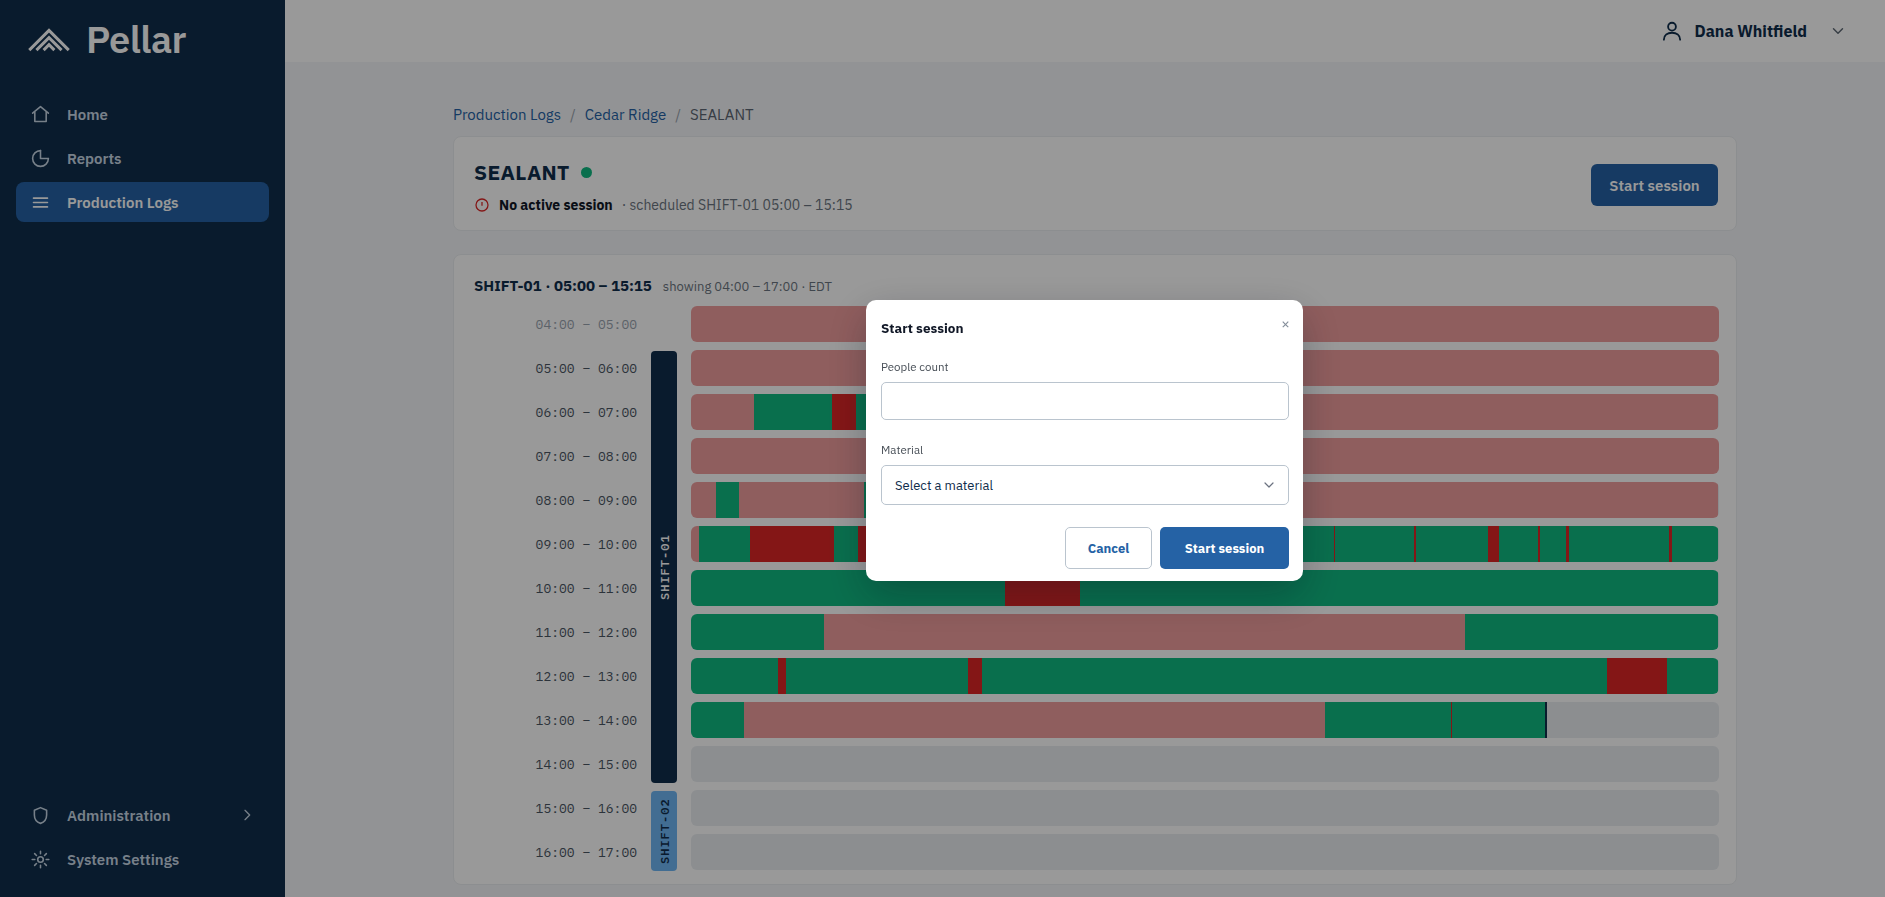
Select the blue Start session button. A window opens and asks for two things.
People count. How many people are working the line. Count yourself as well.
Material. Select the product the line is producing from the list.
Select Start session to begin.
Keeping It Accurate
Conditions change during a shift, and the Session should follow them.
If someone joins the line, add them. If someone leaves, take them off. If the line switches to a different material, change it. All of this is done by updating the Session that is already open, not by ending it and starting a new one.
Adding Reasons to Stops
While the Session is open, the sensors will detect each time the line starts and stops. Each period that the line was running appears as a green block. Each stop appears on the timeline as a light red block, and is also added to the Needs Annotation list below the timeline. The list carries a count of how many stops are still waiting for a reason.
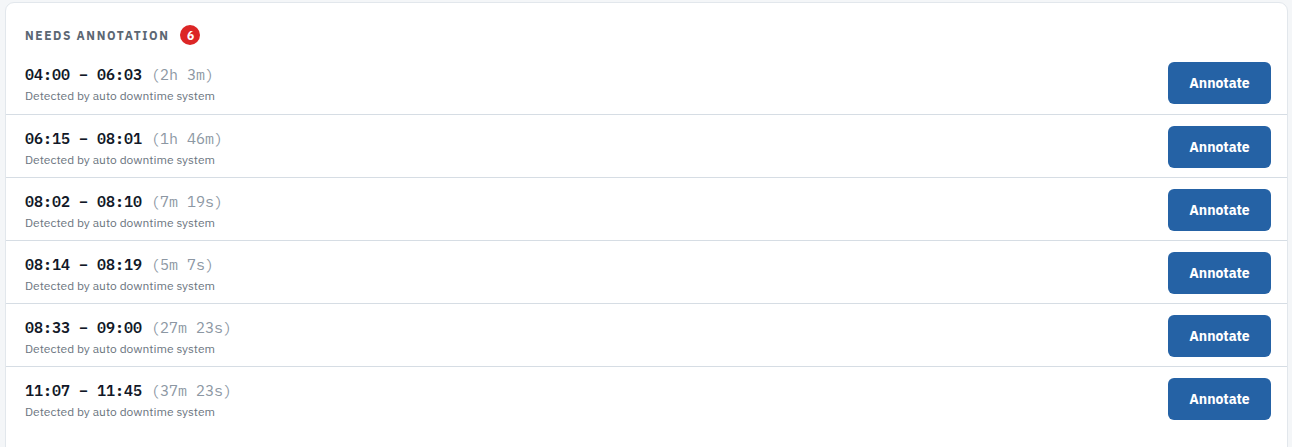
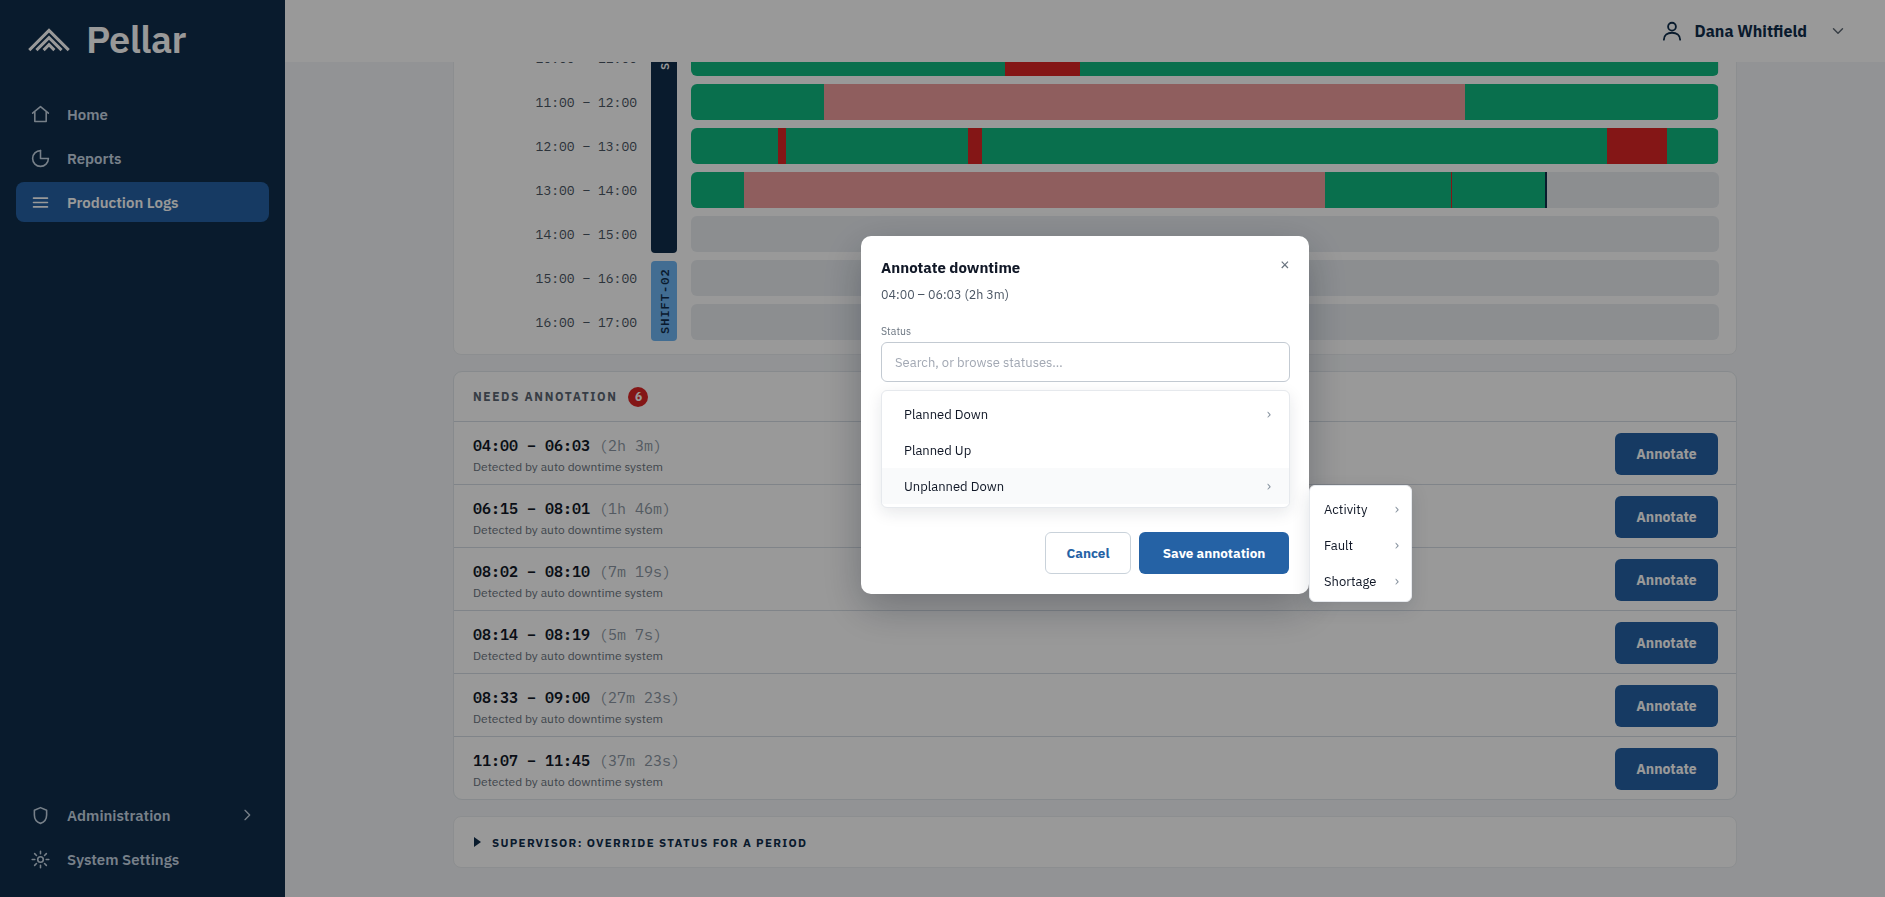
Select a light red block on the timeline, or select Annotate on an entry in the list below the timeline. Both open the same window. The window shows the start and end time of the stop, taken from the sensors.
Then choose the reason that the stop occurred. The reasons are organized as a tree, so you can either type to search or open the categories and work down.
| Category | Use it when |
|---|---|
| Planned Down | The line was stopped on purpose. For example, a break, scheduled maintenance, or a changeover. |
| Planned Up | The line was actively producing. |
| Unplanned Down | The line stopped for a reason that was not intended. For example, a machine jam, or running out of material. |
Be as specific as the tree allows. Unplanned Down on its own tells very little, while Unplanned Down › Activity › Label Change tells exactly what happened.
If you have additional information to share, there is a Notes text box that you can fill out so that maintenance personnel and management understand the cause for the stop in even more detail.
Select Save annotation. The block changes from light red to red, and the entry leaves the list.
Microstops
Very short stops are annotated automatically as a Microstop. It's important to label the reason for each stop, but it's even more important to keep the line running. These short stops are automatically labeled as a Microstop so that you don't have to spend time labeling small stops when you could be operating the line.
Since these short stops are automatically given a reason, they do not appear in the Needs Annotation list. However, if you think that it would be beneficial to provide the reason for the Microstop, you are always able to click the stop on your timeline and provide a more detailed reason.
Ending Your Session
BEFORE YOU END A SESSION
- Check the Needs Annotation count in the list below the timeline, and provide reasons for stops that you haven't yet had the opportunity to annotate.
- If you don't remember the reason for why a specific stop occurred, it's better for you to leave it un-annotated than it is to guess.
Once you've provided reasons for as many stops as you can, select End session.
A window will then appear. If the line is up and running (for example, if you handed the line off to another operator), you can simply click Skip and your session will be completed.
If the line is down (perhaps you're leaving for the day or going on break), you can use the dropdown in the window to set the line into a Planned Down status such as Break or Nothing Scheduled.
Where to Go Next
- What Are Production Logs? — what Production Logs are, what the sensors measure, and what the colors mean.
- Supervisor Overrides — correcting a whole period of time when the recorded data does not match what happened.